Configure
Remote Access IPsec VPNs
This section describes how to configure remote access VPNs.
Configure Interfaces
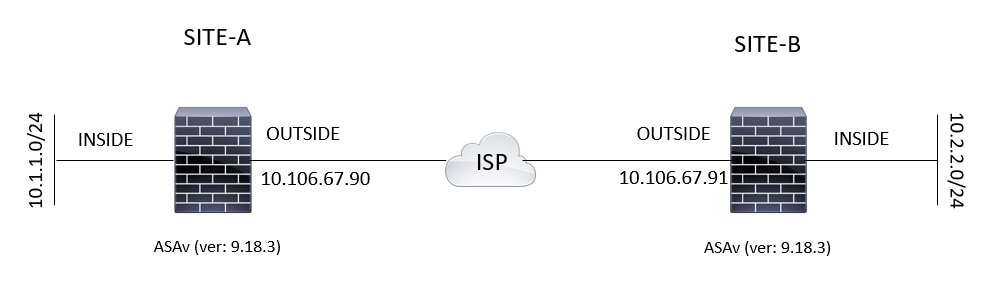
An ASA has at least two interfaces, referred to here as outside
and inside. Typically, the outside interface is connected to the public
Internet, while the inside interface is connected to a private network and is
protected from public access.
To begin, configure and enable two interfaces on the ASA. Then
assign a name, IP address and subnet mask. Optionally, configure its security
level, speed and duplex operation on the security appliance.
Procedure
:-
Step 1
Enter
interface configuration mode from global configuration mode.
interface {interface}
Example:
hostname(config)# interface ethernet0
hostname(config-if)#
|
|
Step 2
Set
the IP address and subnet mask for the interface.
ip address ip_address [mask]
[standby ip_address]
Example:
hostname(config)# interface ethernet0
hostname(config-if)# ip address 10.10.4.200 255.255.0.0
|
|
Step 3
Specify
a name for the interface (maximum of 48 characters). You cannot change this
name after you set it.
nameif name
Example:
hostname(config-if)# nameif outside
hostname(config-if)#
|
|
Step 4
Enable
the interface. By default, interfaces are disabled.shutdown
Example:
hostname(config-if)# no
shutdown
hostname(config-if)#
|
Configure ISAKMP Policy and Enabling ISAKMP on the Outside
Interface
Procedure
Step 1
Specify
the authentication method and the set of parameters to use during IKEv1
negotiation.
Priority
uniquely identifies the Internet Key Exchange (IKE) policy and assigns a
priority to the policy. Use an integer from 1 to 65,534, with 1 being the
highest priority and 65,534 the lowest.
In
the steps that follow, we set the priority to 1.
|
|
Step 2
Specify
the encryption method to use within an IKE policy.
crypto ikev1 policy priority encryption
{aes | aes-192 | aes-256 | des | 3des}
Example:
hostname(config)#
crypto ikev1 policy 1 encryption 3des
hostname(config)#
|
|
Step 3
Specify
the hash algorithm for an IKE policy (also called the HMAC variant).
crypto ikev1 policy priority hash {md5 | sha}
Example:
hostname(config)# crypto ikev1 policy 1 hash sha
hostname(config)#
|
|
Step 4
Specify
the Diffie-Hellman group for the IKE policy—the crypto protocol that allows
the IPsec client and the ASA to establish a shared secret key.
crypto ikev1 policy priority group
{1 | 2 | 5| }
Example:
hostname(config)# crypto ikev1 policy 1 group 2
hostname(config)#
|
|
Step 5
Specify
the encryption key lifetime—the number of seconds each security association
should exist before expiring.
crypto ikev1 policy priority lifetime {seconds}
The
range for a finite lifetime is 120 to 2147483647 seconds. Use 0 seconds for an
infinite lifetime.
Example:
hostname(config)# crypto ikev1 policy 1 lifetime 43200
hostname(config)#
|
|
Step 6
Enable
ISAKMP on the interface named outside.
crypto ikev1 enable interface-name
Example:
hostname(config)# crypto ikev1 enable outside
hostname(config)#
|
|
Step 7
Save
the changes to the configuration.
write memory
|
Configure an Address Pool
The ASA
requires a method for assigning IP addresses to users. This section uses
address pools as an example.
Procedure
Create
an address pool with a range of IP addresses, from which the ASA assigns
addresses to the clients.
ip local pool poolname first-address—last-address [mask mask]
The
address mask is optional. However, You must supply the mask value when the IP
addresses assigned to VPN clients belong to a non-standard network and the
data could be routed incorrectly if you use the default mask. A typical
example is when the IP local pool contains 10.10.10.0/255.255.255.0
addresses, since this is a Class A network by default. This could cause
routing issues when the VPN client needs to access different subnets within
the 10 network over different interfaces.
Example:
hostname(config)# ip local pool testpool 192.168.0.10-192.168.0.15
hostname(config)#
|
Add a User
Procedure
Create
a user, password, and privilege level.
username name {nopassword | password password [mschap | encrypted | nt-encrypted]}
[privilege priv_level]
Example:
Hostname(config)# username testuser password 12345678
|
Create an IKEv1 Transform Set or IKEv2 Proposal
This
section shows how to configure a transform set (IKEv1) or proposal (IKEv2),
which combines an encryption method and an authentication method.
The
following steps show how to create both an IKEv1 and an IKEv2 proposal.
Procedure
Step 1
Configure
an IKEv1 transform set that specifies the IPsec IKEv1 encryption and hash
algorithms to be used to ensure data integrity.
crypto ipsec ikev1 transform-set transform-set-name encryption-method [authentication]
Use
one of the following values for encryption:
·
esp-aes to use AES with a 128-bit key.
·
esp-aes-192 to use AES with a 192-bit key.
·
esp-aes-256 to use AES with a 256-bit key.
·
esp-des to use 56-bit DES-CBC.
·
esp-3des to use triple DES algorithm.
·
esp-null to not use encryption.
Use
one of the following values for authentication:
·
esp-md5-hmac to use the MD5/HMAC-128 as the
hash algorithm.
·
esp-sha-hmac to use the SHA/HMAC-160 as the
hash algorithm.
·
esp-none to not use HMAC authentication.
Example:
To
configure an IKEv1 transform set:
hostname(config)# crypto ipsec transform set FirstSet esp-3des esp-md5-hmac
|
|
Step 2
Configure
an IKEv2 proposal set that specifies the IPsec IKEv2 protocol, encryption,
and integrity algorithms to be used.
esp
specifies the Encapsulating Security Payload (ESP) IPsec protocol (currently
the only supported protocol for IPsec).
crypto ipsec ikev2 ipsec-proposal proposal_name
protocol {esp} {encryption {des | 3des | aes | aes-192 | aes-256 | null}
| integrity {md5 | sha-1}
Use
one of the following values for encryption:
·
des to use 56-bit DES-CBC encryption for
ESP.
·
3des (default) to use the triple DES
encryption algorithm for ESP.
·
aes to use AES with a 128-bit key encryption
for ESP.
·
aes-192 to use AES with a 192-bit key
encryption for ESP.
·
aes-256 to use AES with a 256-bit key
encryption for ESP.
·
null to not use encryption for ESP.
Use
one of the following values for integrity:
·
md5 specifies the md5 algorithm for the ESP
integrity protection.
·
sha-1 (default) specifies the Secure Hash
Algorithm (SHA) SHA-1, defined in the U.S. Federal Information Processing
Standard (FIPS), for ESP integrity protection.
To
configure an IKEv2 proposal:
hostname(config)# crypto ipsec ikev2 ipsec-proposal secure_proposal
hostname(config-ipsec-proposal)#
protocol esp encryption des integrity md5
|
Define a Tunnel Group
A
tunnel group is a collection of tunnel connection policies. You configure a
tunnel group to identify AAA servers, specify connection parameters, and define
a default group policy. The ASA stores tunnel groups internally.
There
are two default tunnel groups in the ASA system: DefaultRAGroup, which is the
default remote-access tunnel group, and DefaultL2Lgroup, which is the default
LAN-to-LAN tunnel group. You can change these groups, but do not delete them.
The ASA uses these groups to configure default tunnel parameters for remote
access and LAN-to-LAN tunnel groups when there is no specific tunnel group
identified during tunnel negotiation.
Procedure
Step 1
Create
an IPsec remote access tunnel-group (also called connection profile).
tunnel-group name type type
Example:
hostname(config)# tunnel-group testgroup type ipsec-ra
hostname(config)#
|
|
Step 2
Enter
tunnel group general attributes mode where you can enter an authentication
method.
tunnel-group name general-attributes
Example:
hostname(config)# tunnel-group testgroup general-attributes
hostname(config-tunnel-general)#
|
|
Step 3
Specify
an address pool to use for the tunnel group.
address-pool [(interface
name)] address_pool1 [...address_pool6]
Example:
hostname(config-general)# address-pool testpool
|
|
Step 4
Enter
tunnel group ipsec attributes mode where you can enter IPsec-specific
attributes for IKEv1 connections.
tunnel-group name ipsec-attributes
Example:
hostname(config)# tunnel-group testgroup ipsec-attributes
hostname(config-tunnel-ipsec)#
|
|
Step 5
(Optional)
Configure a pre-shared key (IKEv1 only). The key can be an alphanumeric
string from 1-128 characters.
The
keys for the adaptive security appliance and the client must be identical. If
a Cisco VPN Client with a different preshared key size tries to connect, the
client logs an error message indicating it failed to authenticate the peer.
ikev1 pre-shared-key key
Example:
hostname(config-tunnel-ipsec)#
pre-shared-key 44kkaol59636jnfx
|
Create a Dynamic Crypto Map
Dynamic
crypto maps define policy templates in which not all the parameters are
configured. This lets the ASA receive connections from peers that have unknown
IP addresses, such as remote access clients.
Dynamic
crypto map entries identify the transform set for the connection. You can also
enable reverse routing, which lets the ASA learn routing information for
connected clients, and advertise it via RIP or OSPF.
Perform
the following task:
Procedure
Step 1
Create
a dynamic crypto map and specifies an IKEv1 transform set or IKEv2 proposal
for the map.
·
For IKEv1, use this command:
crypto dynamic-map dynamic-map-name
seq-num set ikev1 transform-set transform-set-name
·
For IKEv2, use this command:
crypto dynamic-map dynamic-map-name
seq-num set ikev2 ipsec-proposal proposal-name
Example:
hostname(config)# crypto dynamic-map dyn1 1 set ikev1 transform-set
FirstSet
hostname(config)#
hostname(config)# crypto dynamic-map dyn1 1 set ikev2 ipsec-proposal
secure_proposal
hostname(config)#
|
|
Step 2
(Optional)
Enable Reverse Route Injection for any connection based on this crypto map
entry.
crypto dynamic-map dynamic-map-name
dynamic-seq-num set reverse-route
Example:
hostname(config)# crypto
dynamic-map dyn1 1 set reverse route
hostname(config)#
|
Create a Crypto Map Entry to Use the Dynamic Crypto Map
Create
a crypto map entry that lets the ASA use the dynamic crypto map to set the
parameters of IPsec security associations.
In the
following examples for this command, the name of the crypto map is mymap, the
sequence number is 1, and the name of the dynamic crypto map is dyn1, which you
created in the previous section.
Procedure
Step 1
Create
a crypto map entry that uses a dynamic crypto map.
crypto map map-name seq-num ipsec-isakmp
dynamic dynamic-map-name
Example:
hostname(config)# crypto map mymap 1 ipsec-isakmp dynamic dyn1
|
|
Step 2
Apply
the crypto map to the outside interface.
crypto map map-name interface interface-name
Example:
hostname(config)# crypto map mymap interface outside
|
|
Step 3
Saves
the changes to the configuration.
write memory
|
Configuring IPSec IKEv2 Remote Access VPN in Multi-Context Mode
For more information
about configuring Remote Access IPsec VPNs, see the following sections:
Configuration Examples
for Remote Access IPsec VPNs
The
following example shows how to configure a remote access IPsec/IKEv1 VPN:
hostname(config)# crypto ikev1 policy 10
hostname(config-ikev1-policy)# authentication pre-share
hostname(config-ikev1-policy)# encryption aes-256
hostname(config-ikev1-policy)# hash sha
hostname(config-ikev1-policy)# group 2
hostname(config)# crypto ikev1 enable outside
hostname(config)# ip local pool POOL 192.168.0.10-192.168.0.15
hostname(config)# username testuser password 12345678
hostname(config)# crypto ipsec ikev1 transform set AES256-SHA
esp-aes-256 esp-sha-hmac
hostname(config)# tunnel-group RAVPN type remote-access
hostname(config)# tunnel-group RAVPN general-attributes
hostname(config-general)# address-pool POOL
hostname(config)# tunnel-group RAVPN ipsec-attributes
hostname(config-ipsec)# ikev1 pre-shared-key ravpnkey
hostname(config)# crypto dynamic-map DYNMAP 1 set ikev1
transform-set AES256-SHA
hostname(config)# crypto dynamic-map DYNMAP 1 set reverse-route
hostname(config)# crypto map CMAP 1 ipsec-isakmp dynamic DYNMAP
hostname(config)# crypto map CMAP interface outside
The
following example shows how to configure a remote access IPsec/IKEv2 VPN:
hostname(config)# crypto ikev2 policy 1
hostname(config-ikev2-policy)# group 2
hostname(config-ikev2-policy)# integrity sha512
hostname(config-ikev2-policy)# prf sha512
hostname(config)# crypto ikev2 enable outside
hostname(config)# ip local pool POOL 192.168.0.10-192.168.0.15
hostname(config)# username testuser password 12345678
hostname(config)# crypto ipsec ikev2 ipsec-proposal AES256-SHA512
hostname(config-ipsec-proposal)#
protocol esp encryption aes-256
hostname(config-ipsec-proposal)#
protocol esp integrity sha-512
hostname(config)# tunnel-group RAVPN type remote-access
hostname(config)# tunnel-group RAVPN general-attributes
hostname(config-general)# address-pool POOL
hostname(config)# tunnel-group RAVPN ipsec-attributes
hostname(config-tunnel-ipsec)# ikev2 local-authentication
pre-shared-key localravpnkey
hostname(config-tunnel-ipsec)# ikev2 remote-authentication
pre-shared-key remoteravpnkey
hostname(config)# crypto dynamic-map DYNMAP 1 set ikev2
ipsec-proposal AES256-SHA512
hostname(config)# crypto dynamic-map DYNMAP 1 set reverse-route
hostname(config)# crypto map CMAP 1 ipsec-isakmp dynamic DYNMAP
hostname(config)# crypto map CMAP interface outside
class
default
limit-resource All 0
limit-resource Mac-addresses 65536
limit-resource ASDM 5
limit-resource SSH 5
limit-resource Telnet 5
limit-resource VPN AnyConnect 4.0%